Web Services Communication Instance
This setting in SMC configures a communication channel between the Desigo CC server and the IIS web server.
- For all deployments (remote IIS or local IIS), do these steps on the Desigo CC server computer.
- In SMC, stop and edit the project.
- Click Next to reach the page with the Web Services Communication expander.
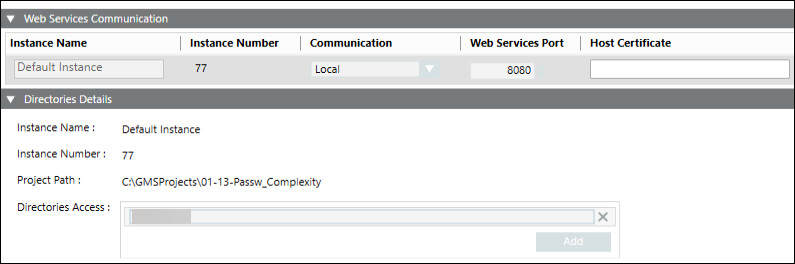
NOTE: Do not confuse this with the Communication Security expander on the first page. The Web Server Communication section there is not required for Web Services and can be left Disabled. - In the expander, locate the communication instance you want to use (each one is on a separate row), or click Add to create a new one.
- Set the Communication field of the instance as follows:
- If the IIS web server is on the same computer as the Desigo CC server, set Local. (You do not need a certificate for this.)
- Otherwise you must set the communication Secured, and select the host certificate to use. See Certificates for Web Services.
- Enter a distinct instance name and adjust the port if required.
- Click Next to reach the final page, and Save
 the project.
For more detailed instructions, refer to the help page Setting up the Web Service Interface, section Configure the Web Service Settings.
Certificates for Web Services
Web Services certificates are required if you have a deployment configuration with a remote IIS web server, in order to secure communication between the IIS web server computer and the Desigo CC server computer.
Do these steps to configure the Host certificate that you will select for Secured communication in the Web Services Communication expander of SMC.
NOTE: If you have a local IIS web server, you can skip these steps.
1 – On the Desigo CC Server Computer, Create a Root Certificate, Import it into the TRCA Store and Set it as Default
- On the Desigo CC server computer, start SMC.
- In the SMC tree, select the Certificate node.
- The Certificates tab displays. This shows the currently configured default certificates (if any) for this Desigo CC installation.
- In the Certificates toolbar, click Create Certificate
 and select Create Root Certificate (.pfx).
 - GMS Root Certificate automatically displays in the Subject Name field.
- Change the subject name to a descriptive name, for example RootCertificate_WebServices.
- Complete the remaining fields to specify the root certificate (.pfx) and (.cer) file names, password, and path on disk.
- Click Save .
- The root certificate files are created and saved at the specified path.
NOTE: Keep a copy of these root certificate files and write down the password for use in the next steps. - In the Certificates toolbar, click Import
 , select the Root certificate certificate type, browse to the (.cer) root certificate file created above, and select Set as default.
 - Click Save .
- The root certificate is imported into the TRCA store of the Desigo CC server computer, and set as the default.
You will later need to import this root certificate into the TRCA store of the remote IIS web server computer. See Step 3 below.
2 – On the Desigo CC Server Computer, Create a Host Certificate for the Server, Import it into the Personal Store, and set it as Default
- In the Certificates toolbar, click Create Certificate and select Create Host Certificate (.pfx).
- In the Root certificate field, browse to the (.pfx) root certificate file created above and enter its password.
- The full computer name of the server is automatically entered in the subject name field.
- Specify the (.pfx) and (.cer) host certificate file names, password, and path on disk.
- Click Save .
- The server host certificate files are created and saved at the specified path.
- In the Certificates toolbar, click Import select the Host certificate certificate type.
- Browse for the (.pfx) host certificate file created above and enter its password.
- Select Set as default and Key is exportable.
- Click Save .
- The server host certificate is imported into the Personal store of the Desigo CC server computer.
3 – On the Remote IIS Web Server Computer, Import the Previously-Created Root Certificate into the TRCA Store, and Set it as Default
- On the IIS web server computer, start SMC.
- In the SMC tree, select the Certificate node.
- In the Certificates toolbar, click Import .
- Select the Root certificate certificate type.
- Browse to the (.cer) root certificate file created in Step 1 above, and select Set as default.
- Click Save .
- The root certificate is imported into the TRCA store of the IIS web server computer, and set as default.
NOTE: This must be the same root certificate that you imported into the TRCA store of the Desigo CC server computer.
Importing this certificate is necessary for the remote IIS web server to recognize the private CA host certificate of the Desigo CC server, which secures the communication between it and the IIS web server.